

Re: Used swirlX for the first time
Thanks for clearing that up.
I will admit, Im really impressed with the scratchX / tech wax combo. My car has never looked this good.
I might try a second pass with the scrachx in a few weeks to see if I can take care of the remainder of the scratches, but like you said, its a daily driver, so I'm not going for perfection.
- If this is your first visit, be sure to check out the FAQ by clicking the link above. You may have to register before you can post: click the register link above to proceed. To start viewing messages, select the forum that you want to visit from the selection below.
-
Re: Used swirlX for the first time
First, used correctly, SwirlX nor any of Meguiar's paint care products will damage paint, we've been doing this for over a hundred years so we have quite a bit of credibility built up on the matter.Originally posted by Lagos View Post
It's more likely that you removed some of the lighter swirls and now the deeper swirls and scratches show up more easily to your eyes. This means they were always there, not put in by SwirlX
I posted about this on the first page of your thread.
Originally posted by Mike Phillips View Post
A paint cleaner is NOT the last step. Applying a wax or a paint sealant is the last step and the idea is as you work through the steps the paint get better and better looking, this implies that it doesn't look it's best till after the last step. I think I touched on this idea in this thread already also?Originally posted by Lagos View Post
Follow me on this,Originally posted by Lagos View Post
If a product has the ability to remove swirls and scratches, another way of thinking of this is the product has the ability to remove a little paint in an effort to level or flatten-out the surface.
If said product can remove paint it will certainly remove any micron thin layer of wax residing on the surface in the first few passes, it's really of no concern.
IF you want to try again, wash and dry the car or wipe the car clean, and then do a Test Spot.
Make sure you can apply and remove SwirlX to one small area and perfect your technique for working by hand and be sure you're getting good results before going over the entire car.
If SwirlX didn't remove all the swirls and scratches the first time regardless if it was because of bad technique or some other reason, then it could be,
You need to use a more aggressive product
The swirls and scratches are too deep to safely remove.
Again, if this is a daily driver then it's usually not a good idea to aim for 100% perfection as the wear-and-tear caused by daily driving will just instill more swirls and scratches into the future.

Leave a comment:
-
Re: Used swirlX for the first time
Mike and everyone else... Thanks for the help so far. It really is great to be able to directly talk to the people who represent these products. It means a lot as a customer.
However I still have this question. If what I was seeing was "damage" to the paint after using swirlx, would the tech wax be able to simply hide all that after one application?
Right now when I look at the car in direct sunlight, i dont see any of the "damage" that I saw right after applying the swirlx.
What should I do if I want to try another pass with the swirlX? I already waxed the car, so can I simply wash/dry it as normal, and apply the swirlX, or do I need to do anything to special to prep the surface since its just been waxed.Leave a comment:
-
Re: Used swirlX for the first time
Also remember a paint cleaner isn't the same thing as a finishing wax and you won't get the same visual results when viewed under BRIGHT LIGHTS.
The hope is that if you use one of our swirl and scratch removers by hand that the paint WILL look great after using it but again, each person's end results is heavily influenced by the persons skill and ability.
The defect removal step is just one step in a process with the last step being the step the gives you your final end-results.

Leave a comment:
-
Re: Used swirlX for the first time
For anyone reading this that is new to polishing on clear coat paints, one of the things we do on this forum is teach and preach the importance of doing a Test Spot first.
Make sure your products of choice, together with your skills and abilities can make one small section look great BEFORE going over the entire car.
If you can't make one small section look great with your process then we'll help you to tweak your technique until you can make a small section look great and then you can tackle the entire car.
TEST SPOT
Doing A Test-Spot
Before going over the entire car, see if you can make just one small section look good, that is apply the product you're planning on using over the entire car to just one small section about a foot squared or so. Work it in and then wipe it off, then apply the polish, work it in but not as much as the compound because now you're not trying to remove paint, just spread the product out, then immediately wipe it off, then apply the wax and let it fully dry and then wipe it off.
Now inspect our results. Make sure you can make one small section look GREAT before going over then entire car. If you can't make one small section look GREAT you won't be able to make the entire car look GREAT.
Make sense?
It should look like this,

And if you're having any problems, the post back here after the test section and we'll help you tweak your technique to insure you get it right.Leave a comment:
-
Re: Used swirlX for the first time
Foam is more gentle to automotive paints the cotton terry cloth which has a fiber nap.Originally posted by Lagos View Post
Sounds like you rubbed too long... there should always be a liquid/wet film on the surface, not dry paint.Originally posted by Lagos View Post
Was in Florida last Sunday and in front of over 35 people I applied SwirlX and Ultimate Compound using a foam applicator pad using the technique I outlined above and all the eyeballs there saw clear, glossy paint after wiping the residue off.
Pictures and comments from Meguiar's Roadshow Class at Autogeek's Detail Fest 2009
We always go over the basics including the correct way to hold an applicator pad and why...

First we tested the polishability of the paint by using the least aggressive product in our demo, SwirlX


First we spread the product out over the area we're going to work and then we start working the
product over the paint putting some passion behind the pad...

Checking our results after one application; while SwirlX did a great job there were still traces of the
deeper swirls, scratches and water drop etchings in the paint so we decided to test out Ultimate Compound.


So it can be done. Applying any thing that abrades the paint means using GREAT technique and the right application material.
Try again, get some soft, foam applicator pads and work a small section and stop before you work to a dry buff.

Polishing paint is an art form, not merely a mechanical process, it requires the right tools and products but also the human elements of care and passion.
Leave a comment:
-
Re: Used swirlX for the first time
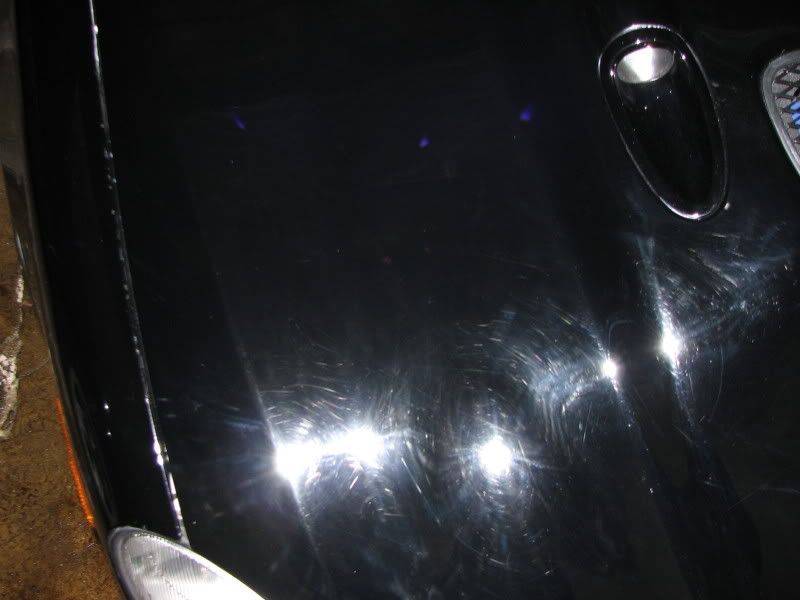
You could be 100% right, and like I said, I thought it *might* be (hard to tell from a single stationary picture without being able to change my viewing angle and see how the light reacts to the paint).Originally posted by Lagos View Post
I highlighted the areas of concern to me. If they move around as you move your viewing angle under the light, they may just be light trails and nothing from your fingers.

Leave a comment:
-
Re: Used swirlX for the first time
This is pretty much exactly what i did. I used a terry applicator pad with a handle on it. What would be the difference between using a terry pad and a foam one?For right now, try this,
After washing or wiping the car clean, apply about a teaspoon of SwirlX using a clean foam applicator pad to a section about 8" to 12" square.
Spread the product out over the area using a overlapping circular to spread it out over the area.
The idea being before your start working the product first spread it out and create a uniform layer of the SwirlX over the area you're going to work.
Now apply some medium pressure and work the section for about a minute. Note that you should never work until the paints starts looking dry, there should always be a wet film when you're working a pad over the surface. If you move a pad over the paint after you've lost lubrication you can marr the paint.
Wipe off this wet film carefully with a clean, soft dry microfiber, the results should look good, as in hopefully less swirls and scratches, (anything that's not very deep), and the paint should be clear and glossy, sometimes like you just waxed it but technique is the key to creating a clear, glossy appearance when working by hand.
The next step would be to move on to new territory and work a new section and be sure to overlap into the previous section for good UMR, Uniform Material Removal for a uniform appearance.
You would repeat this until you work over the entire panel or over the entire car.
I worked each area until I felt the product dry up. By this I mean, that I stopped as soon as I felt that the product was no longer moving smoothly. This is probably around a 1min working time on each section.
My question is this...
Is my theory correct that the only reason the pic after swirlX looks worse, is because there is still some swirlx residue left over that was not fully removed when wiping down? If you look closely, it almost looks like there are large streaks and not scratches in the paint.
Once I applied/removed a layer of wax, this was magically corrected. Its kind of hard to believe that wax was able to just cover up what looks to be like a lot of damage. My theory was that once the wax dried, it made it a lot easier to remove the swirlx that was streaked into the paint.
Not possible for there to be any excess finger tip pressure. I used a terry applicator pad that has a velcro handle attached to it. This gave me about as a uniform application as possible.I might add that it looks like there are some straight motion finger marks as well. This would be from too much concentrated pressure on your finger tips.
I may have used some straight motions, but I believe I read on this forum that the direction of your application should not matter with this product.Leave a comment:
-
Re: Used swirlX for the first time
I might add that it looks like there are some straight motion finger marks as well. This would be from too much concentrated pressure on your finger tips.
Were you pushing hard and rubbing straight forward and backward at some point?Leave a comment:
-
Re: Used swirlX for the first time
Hi Mike,
After spreading out the product, can we work the section in straight motion or do we continue in circular motion?
I know that for ScratchX we can go either circular or straight.Leave a comment:
-
Re: Used swirlX for the first time
Originally posted by Lagos View Post
Originally posted by Lagos View Post
The first goal of a paint cleaner or in this case a cleaner/polish is to remove a little paint so it will level the surface and thus remove the below surface defects. The second goal is to do this in such as way as to not simply replace one set of defects with a new set of defects and the next goal is to hopefully leave as nice of looking finish as technology in partnership with human skill level will allow.
A couple of questions?
How big of an area did you work at at time?
When you say terry pad, do you mean like one of the round terry cloth applicator pads you can buy at most auto parts stores?
Using good technique with a foam applicator pad you should be able to apply and work the SwirlX to a small area and leave a fairly nice finish although remember the paint cleaner isn't the last step in a multiple step process.
For right now, try this,
After washing or wiping the car clean, apply about a teaspoon of SwirlX using a clean foam applicator pad to a section about 8" to 12" square.
Spread the product out over the area using a overlapping circular to spread it out over the area.
The idea being before your start working the product first spread it out and create a uniform layer of the SwirlX over the area you're going to work.
Now apply some medium pressure and work the section for about a minute. Note that you should never work until the paints starts looking dry, there should always be a wet film when you're working a pad over the surface. If you move a pad over the paint after you've lost lubrication you can marr the paint.
Wipe off this wet film carefully with a clean, soft dry microfiber, the results should look good, as in hopefully less swirls and scratches, (anything that's not very deep), and the paint should be clear and glossy, sometimes like you just waxed it but technique is the key to creating a clear, glossy appearance when working by hand.
The next step would be to move on to new territory and work a new section and be sure to overlap into the previous section for good UMR, Uniform Material Removal for a uniform appearance.
You would repeat this until you work over the entire panel or over the entire car.
After this you could polish as an optional step with a pure polish or skip right to the wax or paint sealant.
Leave a comment:
-
Re: Used swirlX for the first time
Can a product like Ultimate Compound work by had if applie with enough "passion"???Leave a comment:
-
Re: Used swirlX for the first time
Sorry guys. I placed the wrong link for the second picture.
This is how it really looked after the swrilX
Leave a comment:
-
Re: Used swirlX for the first time
Hard to tell from the pictures but usually when you correctly apply a swirl and scratch remover you'll remove the most shallow swirls and scratches first and what this does is makes the deeper swirls and scratches show up more easily to your eyes, it more or less makes the the deeper swirls and scratches that were already there stand out like a sore thumb because now there are less swirls overall to cloud or camouflage the deeper ones.
Looks better and looks normal to me. Also looks like you might want to try ScratchX 2.0 or Ultimate Compound.
Leave a comment:

Leave a comment: