

 Tweet
Tweet
Product Review: Meguiar's DA Power System
Meguiar's DA Power System

(Image Taken From Meguiar's Direct)
Price:
$59.99
Introduction:
Meguiar's always comes out with cool new products every year. I always look forward to the SEMA show every year not only to see amazing car builds and cool products but also to see what Meguiar's has up their sleeve. The last SEMA show was no different. Meguiar's introduced the DA power system formally and the product has intrigued me ever since.
Our very own MOL administrator posted a thread on how to use the W9204 4" Softbuff 2.0 Finishing Pads to apply paste wax to your vehicle using a G110v2. The thread can be found here: Applying paste wax via G110v2 or other D/A. Ever since I saw that thread, I've always applied my paste waxes by machine now and I LOVE IT!
Half a year or so ago, I moved to an apartment. I'm already having a hard time washing my car and moving caused me to try alternative ways of washing my car like rinseless and waterless. Because I don't have a power source in my parking spot, I am also forced to wax by hand. But ever since the DA power system came out, I wanted to get my hands on it mainly to use with a cordless drill so that I can apply my favorite Meguiar's paste wax to our vehicles without the need for power. At the same time, make my wax application a lot easier.
The System:
Meguiar's made this product into a system so that it will be easy for everyone to understand how to use it. As a detailer, you know that there is the paint cleaning or compounding phase, polishing phase and waxing phase. Meguiar's recommends a specific pad with a specific product for each of these phases and I think it's brilliant that they make it so clear. In fact, they even have individual products made for them. Each step of the system are:
There are various reviews and a quik tips video already out there so I'm not going to bore you with pictures of using the pad and liquid for each step/phase. One can easily watch the quik tips video and understand very quickly. Instead, I'm going to perform a comparison between the DA Power System and your traditional G110v2 DA polisher.
The Comparison:
Here are some close up pictures of the DA Power System in the wild.


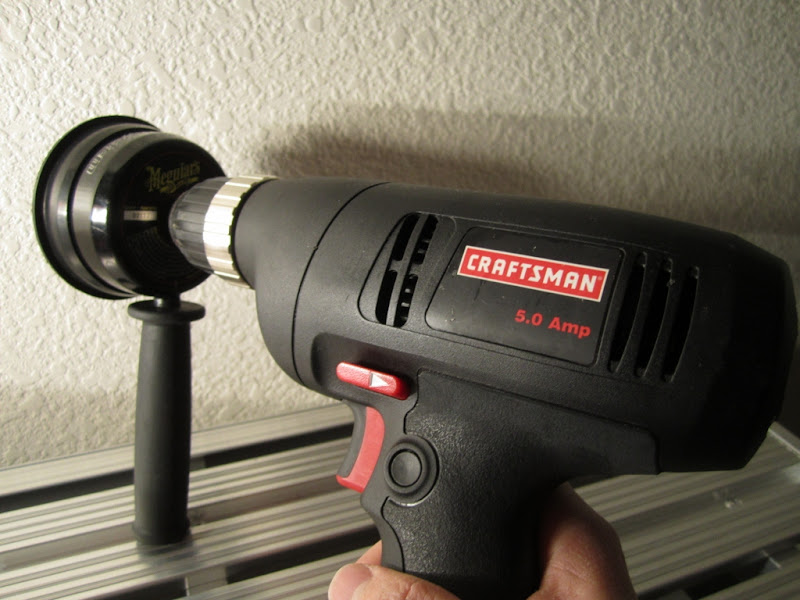
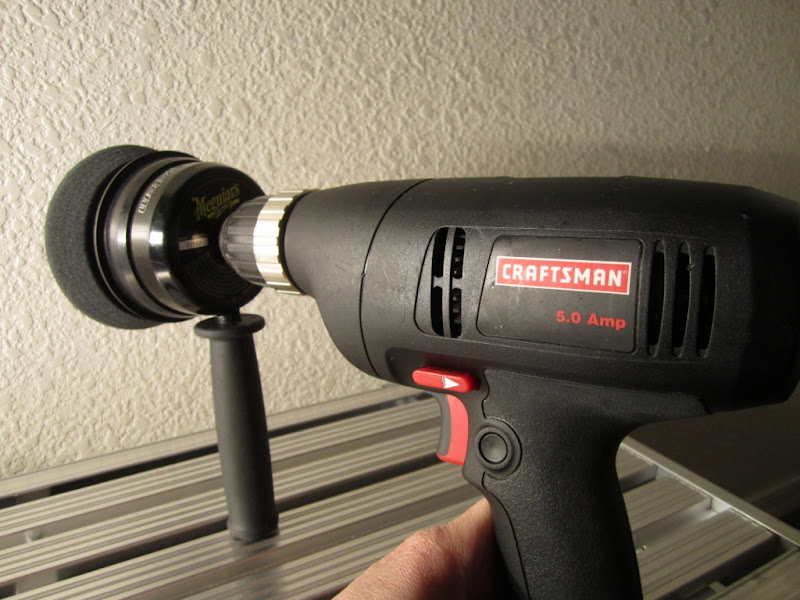
Like any product Meguiar's produces, this is a very high quality and well designed product. In order for this product to work, you need a corded drill. What you do next is open the drill's teeth attachment to its maximum, slide the DA Power System's spindle into the drill's mouth, then lock the drill as tightly as you can. After you're done with this step, this is what the product looks like attached to the drill:

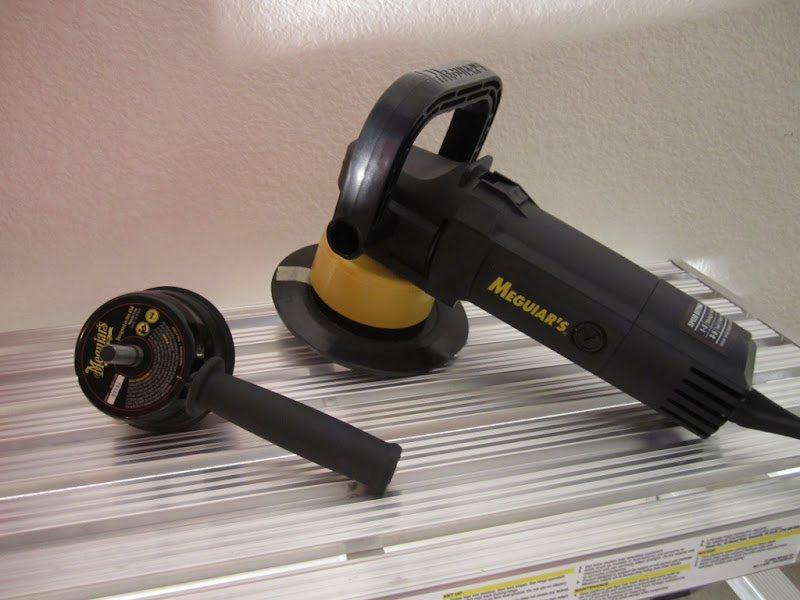
For this review, I was mainly interested in the capabilities of the DA Power System. A lot of questions were floating in my head. Is this system capable of serious defect removal? Is it easy to use as the DA polisher? Is it convenient? Etc. Well I'm going to try to answer as much questions as I can. Now on to the comparison. Here are the contenders:
To make the comparison fair, I'm going to hold all variables constant. What I mean is that all the other factors that can affect polishing performance will be held equal between the 2 polishers. I'm going to use Ultimate Compound and the Softbuff 2.0 Yellow Polishing pads for both as shown:

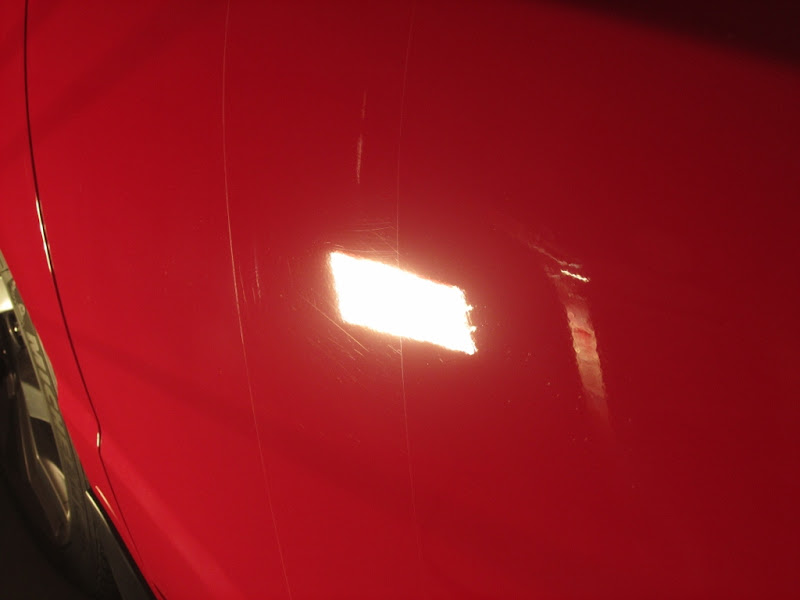
Here is a picture of the test subject:

It's a swirled out door panel of my car. The swirls are much worse than you can see in the picture. I was having a hard time capturing the swirls because the light was flushing them out. Next, I taped the door panel into 3 sections as shown:

The left side will be for the DA Power System, the center will be the control and the right will be for the G110v2 DA polisher.
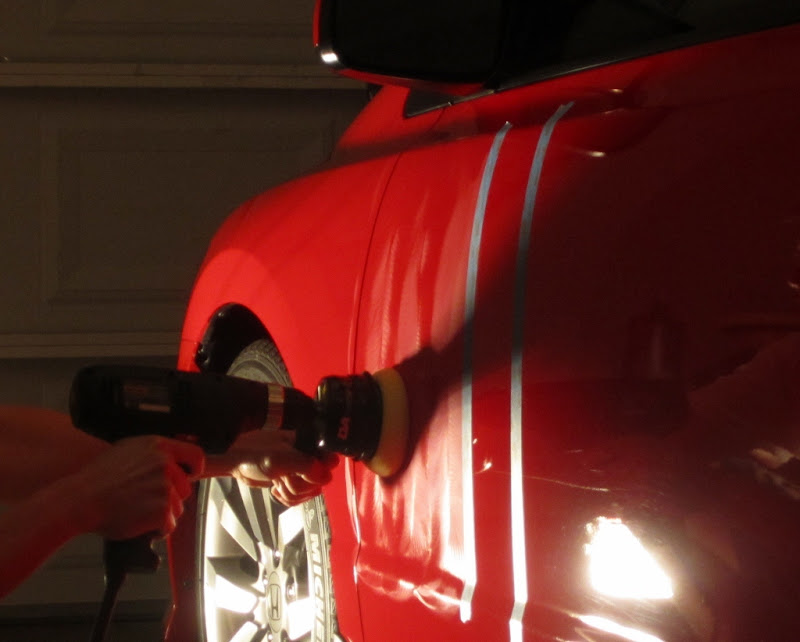
Now onto the test. Up first is the DA Power System. Again, I'm using this system with a yellow polishing pad with Ultimate Compound. What you do is apply a line of product onto the pad like so:

Next, put the pad flat against the paint surface you're working on. Do not turn on the machine until you do this because it will sling the compound everywhere and create a mess. You don't want that. Always work clean! Polish the area you intend to work on making sure you do 50% overlapping passes.
As you can see, the DA power system gives very uniform coverage and spreads out the product nice and even.

Now, we do the same steps on the right side of the panel using the G110v2 DA polisher.
Priming the pad:

Working the product in and polishing the area intended:

Uniform and even coverage:

What are the results you might ask? Well I'll let the pictures do the talking.
Here are the results from the DA Power System's side. I would say I achieved around 95% correction relative to the G110v2's side.

Now here's the G110v2 DA polisher's side.
They both look the same but the DA power system left a few deeper scratches. I wouldn't blame it on the system because they recommend using the cutting pad for this kind of work. I'm sure that if I equipped my power system with the said cutting pad, I will achieve the same type of correction as what I got in the G110v2's side. I'm sorry I didn't have any cutting pads at hand. But I think these results speak for themselves. The DA Power system is definitely capable of removing serious swirls and defects.
My co-worker has some water spotting problem in his car and was asking for my advice on how to remove it. At first, I gave him ScratchX and told him to go to town with it. He came back and said it wasn't removing all of them and it was such a PITA to work the product in by hand. I thought this will be the perfect time to use the DA power system!!
Here is the test vehicle. As you can see, water spots galore. I've already washed the vehicle at this point and the water spots weren't going anywhere.

Again, I'm using Ultimate Compound with the yellow polishing pad. Before using it, prime the pad first as shown:

Buff a small area at a time. Make sure you do 50% overlapping passes and apply pressure on the drill because you're doing defect removal. This is shown below:
Here are the results after! I would say that we achieved 80-85% water spot removal. It would have been better if I had the burgundy cutting pads. How I really wished I had those pads at that time.

Cross-Compatibility:
I wanted to see whether this system will work with other manufacturer's 4" pads. For this test, I'm using the 4" Lake Country pads. I've attached them to the DA Power System and they look like this:


I would say that there's approximately half an inch of gap in between the backing plate and the circumference of the pad's velcro attachment. It will work but if you're going to be using coarser pads for defect removal, you will not achieve its maximum potential. I guess if you're going to use a softer foam for waxing then it will be ok.
I would still recommend using the Meguiar's DA Power Pack Pad Refills though. This is because these 4" pads have a tapering side. The face of the foam pad is 4" but the pad's backing where the velcro attachment is located measures about 3". This makes it a perfect fit for the DA Power System's backing plate.
Now to show you the main reason why I bought this tool in the first place - waxing!!!!
First, attach the black foam finishing pad specifically designed for waxing. This is shown below:
Here's a picture of the finishing pad being dipped into a can of Ultimate Paste Wax. As you can see, it fits perfectly!!!

Gently rub the pad against the wax to get some product into the face of the foam pad. This is what your pad should look like after:

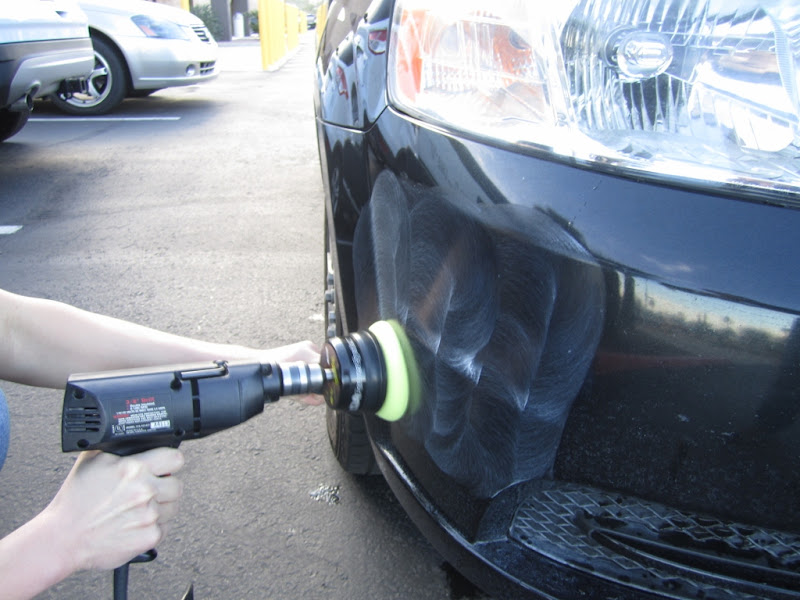
Like with everything, place the pad against the paint before turning on the drill. Since we are only waxing, very little pressure is required, if any. Also, there's no need for slow arm speed.

The beauty of machine applying a wax. Uniform coverage and fast and easy application! This is shown below:


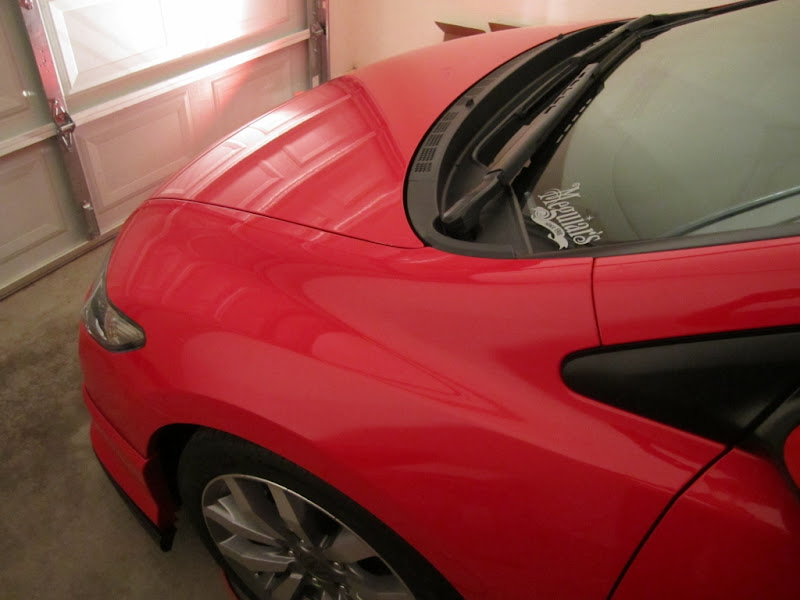
Here are some beauty shots after I removed a coat of Ultimate Paste Wax that I applied throughout the entire vehicle:


Opinions and Observations:
As you can see, the DA Power System has the capability for serious defect removal. When matched with the burgundy cutting pad, I'm sure it will work wonders. I really like a lot of its features. I really like the rubber surrounding the lip of the Power System. This will prevent any scratching in the case you hit the paint of the vehicle you're working on. I've hit the paint twice already and I'm so thankful that this rubber feature is there for protection. (That just sounds weird LOL!) I also like the comfortable handle. It has a soft material making it comfortable to hold while buffing. Also, the handle's placement is great because this allows me to stabilize the Power System and the drill attached to it while buffing. I also like the forced rotation feature. I initially thought that this will have the motion of your traditional DA polishers. The forced rotation feels exactly like the Flex 3401's movement. This feature allows for better cutting capability and we've already proven that it has the ability to do so. The pad also spins/oscillates slower relative to the drill's RPMs. This is the gear reduction feature and it makes it extremely safe for the user to polish paint.
Now I would like to talk about the comparison test I did above. Yes, the DA Power System's results look good and I'm pretty sure, it will equal the correction made if I had used the recommended cutting pads for defect removal. But I would say that because the pads are small, polishing took longer. The G110v2 took a shorter time because of its massive 7" pads. It covered a bigger area at a time. Also, the G110v2 has more power so I think it's getting more correction power from the motor itself.
I would also like to talk about some minor downsides to this system. I really didn't like how wobbly it felt. The wobbling is directly proportional to the amount of pressure I was applying. When I was applying wax, I didn't have much of a problem with it. But when I was trying to remove the swirls and water spots, it made it harder to control. Also, I have a hard time holding the drill when buffing vertical panels. I think this is because of the leverage the drill causes. Buffing horizontal surfaces is a piece of cake!!! It's so easy to control the drill and the Power System when doing that.
I absolutely love using the DA Power System when waxing and spot buffing!!! I'm so glad that I have this system because I think it'll be very useful and it will have its place in my tool arsenal. I'm sure there are situations that will make me reach for this tool instead of your traditional DA polisher equipped with 4" pads. In addition, it served my purpose of waxing my vehicles in the apartment by using a cordless drill. It did it exceptionally well I might add.
As I mentioned before, the quality of this tool is exceptional.
I'm sure that majority of the people will own a drill at home. If you're new to paint polishing and already have a drill then it would be ok to get this tool. But if you don't have a drill and plan on buying a new drill with the purchase of the DA Power System, I would highly suggest looking into getting the G110v2 DA polisher instead. This only applies when the cost is your only concern. But if you're afraid of the DA polisher then by all means get the DA Power System.
Conclusion:
This machine is a must have whether you are a seasoned professional detailer, a hobbyist or a person who's new into paint polishing. It definitely bridges the gap between dual action polishers and working by hand. If you are afraid to dive into the DA polisher and are tired of working by hand then this tool is for you. It will give you better results in less time and effort than working by hand. At the same time, give you swirl removal capabilities like the traditional DA polisher at a fraction of the price. I love this Power System of mine and I'm glad to obtain it. I'm pretty sure that you will not regret your decision in buying one.
Meguiar's DA Power System
(Image Taken From Meguiar's Direct)
Price:
$59.99
Introduction:
Meguiar's always comes out with cool new products every year. I always look forward to the SEMA show every year not only to see amazing car builds and cool products but also to see what Meguiar's has up their sleeve. The last SEMA show was no different. Meguiar's introduced the DA power system formally and the product has intrigued me ever since.
Our very own MOL administrator posted a thread on how to use the W9204 4" Softbuff 2.0 Finishing Pads to apply paste wax to your vehicle using a G110v2. The thread can be found here: Applying paste wax via G110v2 or other D/A. Ever since I saw that thread, I've always applied my paste waxes by machine now and I LOVE IT!
Half a year or so ago, I moved to an apartment. I'm already having a hard time washing my car and moving caused me to try alternative ways of washing my car like rinseless and waterless. Because I don't have a power source in my parking spot, I am also forced to wax by hand. But ever since the DA power system came out, I wanted to get my hands on it mainly to use with a cordless drill so that I can apply my favorite Meguiar's paste wax to our vehicles without the need for power. At the same time, make my wax application a lot easier.
The System:
Meguiar's made this product into a system so that it will be easy for everyone to understand how to use it. As a detailer, you know that there is the paint cleaning or compounding phase, polishing phase and waxing phase. Meguiar's recommends a specific pad with a specific product for each of these phases and I think it's brilliant that they make it so clear. In fact, they even have individual products made for them. Each step of the system are:
- Compounding - Ultimate Compound and 4" Cutting Pad

(Image Taken From Meguiar's Direct) - Polishing - Ultimate Polish and 4" Polishing Pad

(Image Taken From Meguiar's Direct) - Waxing - Ultimate Wax and 4" Finishing Pad

(Image Taken From Meguiar's Direct)
There are various reviews and a quik tips video already out there so I'm not going to bore you with pictures of using the pad and liquid for each step/phase. One can easily watch the quik tips video and understand very quickly. Instead, I'm going to perform a comparison between the DA Power System and your traditional G110v2 DA polisher.
The Comparison:
Here are some close up pictures of the DA Power System in the wild.
Like any product Meguiar's produces, this is a very high quality and well designed product. In order for this product to work, you need a corded drill. What you do next is open the drill's teeth attachment to its maximum, slide the DA Power System's spindle into the drill's mouth, then lock the drill as tightly as you can. After you're done with this step, this is what the product looks like attached to the drill:
For this review, I was mainly interested in the capabilities of the DA Power System. A lot of questions were floating in my head. Is this system capable of serious defect removal? Is it easy to use as the DA polisher? Is it convenient? Etc. Well I'm going to try to answer as much questions as I can. Now on to the comparison. Here are the contenders:
To make the comparison fair, I'm going to hold all variables constant. What I mean is that all the other factors that can affect polishing performance will be held equal between the 2 polishers. I'm going to use Ultimate Compound and the Softbuff 2.0 Yellow Polishing pads for both as shown:
Here is a picture of the test subject:
It's a swirled out door panel of my car. The swirls are much worse than you can see in the picture. I was having a hard time capturing the swirls because the light was flushing them out. Next, I taped the door panel into 3 sections as shown:
The left side will be for the DA Power System, the center will be the control and the right will be for the G110v2 DA polisher.
Now onto the test. Up first is the DA Power System. Again, I'm using this system with a yellow polishing pad with Ultimate Compound. What you do is apply a line of product onto the pad like so:
Next, put the pad flat against the paint surface you're working on. Do not turn on the machine until you do this because it will sling the compound everywhere and create a mess. You don't want that. Always work clean!
Polish the area you intend to work on making sure you do 50% overlapping passes. As you can see, the DA power system gives very uniform coverage and spreads out the product nice and even.
Now, we do the same steps on the right side of the panel using the G110v2 DA polisher.
Priming the pad:
Working the product in and polishing the area intended:
Uniform and even coverage:
What are the results you might ask? Well I'll let the pictures do the talking.
Here are the results from the DA Power System's side. I would say I achieved around 95% correction relative to the G110v2's side.
Now here's the G110v2 DA polisher's side.
They both look the same but the DA power system left a few deeper scratches. I wouldn't blame it on the system because they recommend using the cutting pad for this kind of work. I'm sure that if I equipped my power system with the said cutting pad, I will achieve the same type of correction as what I got in the G110v2's side. I'm sorry I didn't have any cutting pads at hand. But I think these results speak for themselves. The DA Power system is definitely capable of removing serious swirls and defects.
My co-worker has some water spotting problem in his car and was asking for my advice on how to remove it. At first, I gave him ScratchX and told him to go to town with it. He came back and said it wasn't removing all of them and it was such a PITA to work the product in by hand. I thought this will be the perfect time to use the DA power system!!
Here is the test vehicle. As you can see, water spots galore. I've already washed the vehicle at this point and the water spots weren't going anywhere.
Again, I'm using Ultimate Compound with the yellow polishing pad. Before using it, prime the pad first as shown:
Buff a small area at a time. Make sure you do 50% overlapping passes and apply pressure on the drill because you're doing defect removal. This is shown below:
Here are the results after! I would say that we achieved 80-85% water spot removal. It would have been better if I had the burgundy cutting pads. How I really wished I had those pads at that time.
Cross-Compatibility:
I wanted to see whether this system will work with other manufacturer's 4" pads. For this test, I'm using the 4" Lake Country pads. I've attached them to the DA Power System and they look like this:
I would say that there's approximately half an inch of gap in between the backing plate and the circumference of the pad's velcro attachment. It will work but if you're going to be using coarser pads for defect removal, you will not achieve its maximum potential. I guess if you're going to use a softer foam for waxing then it will be ok.
I would still recommend using the Meguiar's DA Power Pack Pad Refills though. This is because these 4" pads have a tapering side. The face of the foam pad is 4" but the pad's backing where the velcro attachment is located measures about 3". This makes it a perfect fit for the DA Power System's backing plate.
Now to show you the main reason why I bought this tool in the first place - waxing!!!!
First, attach the black foam finishing pad specifically designed for waxing. This is shown below:
Here's a picture of the finishing pad being dipped into a can of Ultimate Paste Wax. As you can see, it fits perfectly!!!
Gently rub the pad against the wax to get some product into the face of the foam pad. This is what your pad should look like after:
Like with everything, place the pad against the paint before turning on the drill. Since we are only waxing, very little pressure is required, if any. Also, there's no need for slow arm speed.
The beauty of machine applying a wax. Uniform coverage and fast and easy application! This is shown below:
Here are some beauty shots after I removed a coat of Ultimate Paste Wax that I applied throughout the entire vehicle:
Opinions and Observations:
As you can see, the DA Power System has the capability for serious defect removal. When matched with the burgundy cutting pad, I'm sure it will work wonders. I really like a lot of its features. I really like the rubber surrounding the lip of the Power System. This will prevent any scratching in the case you hit the paint of the vehicle you're working on. I've hit the paint twice already and I'm so thankful that this rubber feature is there for protection. (That just sounds weird LOL!) I also like the comfortable handle. It has a soft material making it comfortable to hold while buffing. Also, the handle's placement is great because this allows me to stabilize the Power System and the drill attached to it while buffing. I also like the forced rotation feature. I initially thought that this will have the motion of your traditional DA polishers. The forced rotation feels exactly like the Flex 3401's movement. This feature allows for better cutting capability and we've already proven that it has the ability to do so. The pad also spins/oscillates slower relative to the drill's RPMs. This is the gear reduction feature and it makes it extremely safe for the user to polish paint.
Now I would like to talk about the comparison test I did above. Yes, the DA Power System's results look good and I'm pretty sure, it will equal the correction made if I had used the recommended cutting pads for defect removal. But I would say that because the pads are small, polishing took longer. The G110v2 took a shorter time because of its massive 7" pads. It covered a bigger area at a time. Also, the G110v2 has more power so I think it's getting more correction power from the motor itself.
I would also like to talk about some minor downsides to this system. I really didn't like how wobbly it felt. The wobbling is directly proportional to the amount of pressure I was applying. When I was applying wax, I didn't have much of a problem with it. But when I was trying to remove the swirls and water spots, it made it harder to control. Also, I have a hard time holding the drill when buffing vertical panels. I think this is because of the leverage the drill causes. Buffing horizontal surfaces is a piece of cake!!! It's so easy to control the drill and the Power System when doing that.
I absolutely love using the DA Power System when waxing and spot buffing!!! I'm so glad that I have this system because I think it'll be very useful and it will have its place in my tool arsenal. I'm sure there are situations that will make me reach for this tool instead of your traditional DA polisher equipped with 4" pads. In addition, it served my purpose of waxing my vehicles in the apartment by using a cordless drill. It did it exceptionally well I might add.
As I mentioned before, the quality of this tool is exceptional.
I'm sure that majority of the people will own a drill at home. If you're new to paint polishing and already have a drill then it would be ok to get this tool. But if you don't have a drill and plan on buying a new drill with the purchase of the DA Power System, I would highly suggest looking into getting the G110v2 DA polisher instead. This only applies when the cost is your only concern. But if you're afraid of the DA polisher then by all means get the DA Power System.
Conclusion:
This machine is a must have whether you are a seasoned professional detailer, a hobbyist or a person who's new into paint polishing. It definitely bridges the gap between dual action polishers and working by hand. If you are afraid to dive into the DA polisher and are tired of working by hand then this tool is for you. It will give you better results in less time and effort than working by hand. At the same time, give you swirl removal capabilities like the traditional DA polisher at a fraction of the price. I love this Power System of mine and I'm glad to obtain it. I'm pretty sure that you will not regret your decision in buying one.


 btw, the car looks great


Comment