

 Tweet
Tweet
The thickness of paint on a car determines how aggressively it can be polished in the quest to remove surface imperfections such as swirl marks or scratches. Assessing what thickness of paint is “healthy” and what is “thin” however is very difficult and requires a lot more effort than simply placing a Paint Thickness Gauge (PTG) on the paint and comparing the reading to a “known” range. The problem lies with the fact that all manufacturers can use different paint systems with varying thicknesses which makes it difficult to pigeon-hole specific readings as healthy, thin or otherwise.
The vast majority of paint systems used on cars today come in three layers: the base coat, the colour coat and the clear coat as shown below.
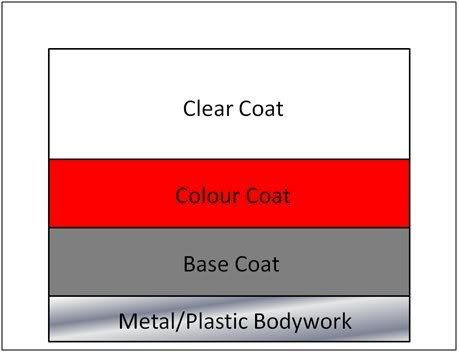
In these cases you are only ever polishing the clear coat (which is why your pad doesn’t turn the colour of the car). Polishing through the clear coat is known as “strike through” – terminal paint damage that can only be repaired with a re-spray and should therefore be avoided at all costs!
The paint thickness you most want to know is that of the clear coat – however, the majority of paint gauges on the market give you a total thickness reading only. On the face of it this may seem like a useless reading – how do you know how much of the (say) 110µm of paint is clear coat? One answer is to use a gauge which gives you multi-layer readings. However these are expensive and generally out of practical reach for most detailers. Another answer is to use your total layer thickness gauge as a detective, and read the information it gives you wisely. A single reading on its own means nothing. Multiple readings across the car allow you to build up a picture and leave you better informed as to the most appropriate course of action for machine polishing.
Consistency is the Key
With different manufacturers using different paint systems, a reading which may be thick for say a Mazda may be thin for a Volkswagen. Some cars, for example the Ferrari 355, were hand painted and have readings three or four times thicker than what you would find on a 21st century hatchback. Even the same make and model of car will vary for a variety of reasons. Despite there being no consistency across the paints of different cars, you should see a consistency in the paint thickness of the car that you are working on.
For example, all side panels you would expect to be roughly in the same paint range. Likewise, you would expect consistency in thicknesses across say the bonnet. There will be variations but you would not expect them to be large. Rather than picking up on individual readings the aim is to see how consistent the readings are on the car and if there are any thick or thin regions which stand out which would point to either repair of previous heavy polishing. In both cases you would want to exercise great care when machine polishing.
You can then take this one step further – consistency across a panel. Now if you look at a painted panel, you can generally see an orange peel effect which points to an inconsistency in thickness. The peaks and valleys look to have very different thicknesses but this is actually just an optical illusion – the variance is typically only a few microns and a small percentage of the total thickness. With this in mind you would not expect to see large variances (of order 30, 40, 50µm) across a panel. So you can look out for specific regions that show readings notably different to the panel as a whole, giving you an indication of possible thin or thick spots.
In Practice - Assessing Before Polishing
Before using a machine polisher it is important to assess the thickness of paint you have available to you. In this section we will look at how to use a single layer paint thickness gauge to its full potential to give you as much information as possible about the paint thickness available for polishing.
Take the paint measurements in two main stages: general readings across the whole car; detailed readings over individual panels.
1 - General Readings Across The Car
The first set of readings to take are across the car as a whole, with a “few” readings per panel (10, 20 or so). Take a note of the readings and at first compare individual panels to each other.
Take the following example of a car with paint thickness readings shown in the diagram below (simplified to one reading per panel for this discussion).
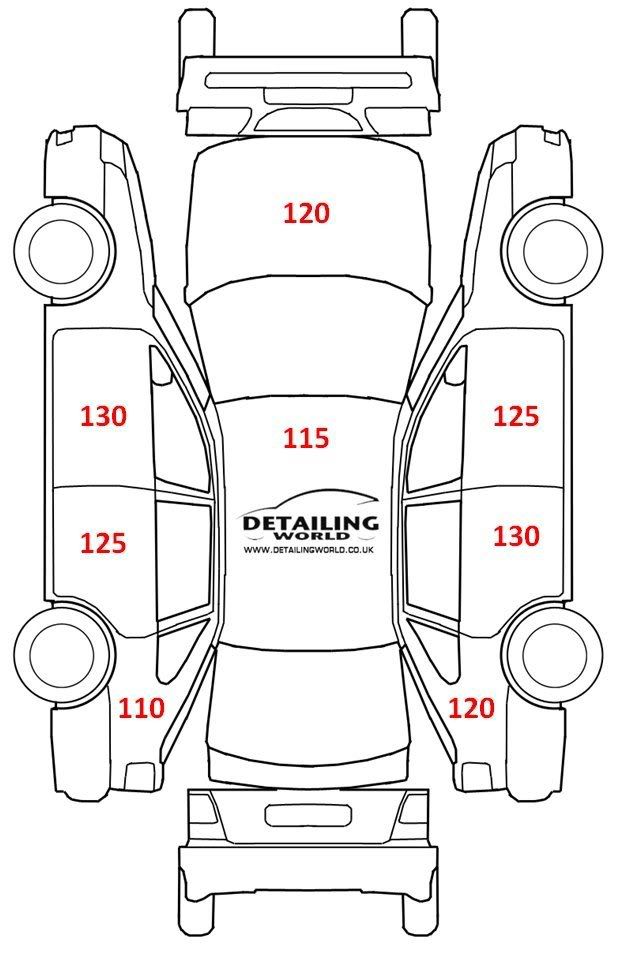
Here we can see that all of the panels have roughly the same readings in the range of 110µm to 130µm. It is generally assumed that readings of this level are “normal” as well, and that the thickness is “healthy”. However the numbers really don’t give you this information, they simply show that the readings are consistent across the car. This is a good indication that the car has not seen any paintwork repairs and is also a fair indication that there has been no aggressive polishing previously but this latter assumption should not be read as gospel!
Compare this now to the example shown below.

Contrary to the first example which showed similar paint readings, this car shows two clear inconsistencies. Namely the rear passenger side door and the front driver’s side door.
The rear passenger door shows a paint reading which is abnormally high compared to the rest of the car. This is a good indication that this panel has seen a paintwork repair at some point as resprayed panels typically have thicker readings. If all of the car gave these readings then this would be an indication of a possible full respray. However you could not say this for sure as the car itself may have just had thicker paint from the factory. The biggest telling factors here are the inconsistencies rather than the actual paint readings.
The front driver’s door is showing readings which are abnormally low compared to the rest of the car. This is an indication that this region has been heavily polished or compounded before as there has been notable paint removal. In some instances scratches are removed by wet sanding which, when done without consideration, can leave low regions of paintwork. In the case of all of the car having thin paint readings it is a possible indication of full machine polishing previously. However it could also be that the paint thickness is just naturally thin on the car.
2 - Detailed Readings
Having assessed the panels of the car against each other to get a global picture of which may have seen some sort of work in the past, it is now time to look at the panels on their own. It may be tempting to just take a few paint readings and go round the full car in a few minutes. However this will not give you all the information you need to be polishing the car safely.
In this section we look at taking detailed paint readings across the paint on a car. Having spent a lot of money on a paint gauge, you are best to get the most out of it! So spend a good hour or two taking paint readings. It may sound ridiculous but it may just save you from a strike through!
Take the bonnet as an example. Take a paint reading every inch to two inches. An example of some paint readings from a bonnet is shown below.
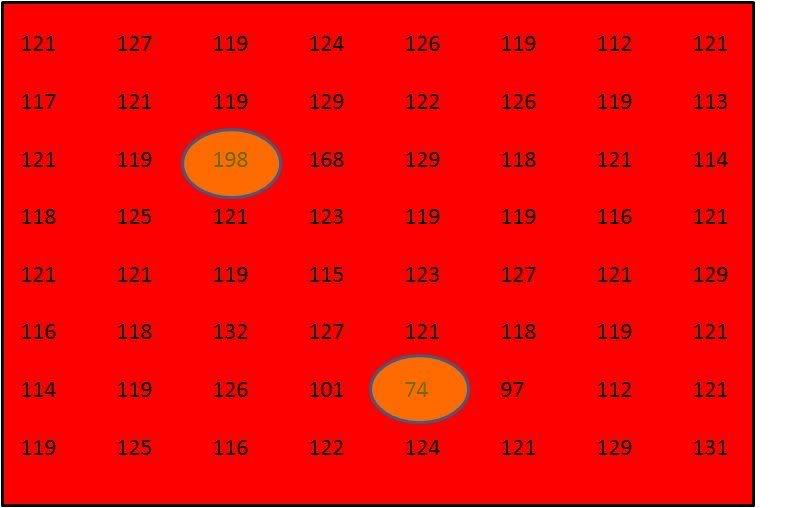
The consistent reading on the bonnet is between 110µm and 135µm. This is a typical variation across the panel. However we can also see two readings which raise concern – one in the top left and the other bottom middle, both highlighted. One reading is much thicker than the rest of the panel which points to a small region of paint repair or even filler. The other regions shows a thin spot on the panel which points to previous repair by abrasive polishing or wet sanding.
If you were only to take three or four readings per panel, then small regions of concern like the ones above would be missed. This clearly shows the importance of taking many readings across each of the panels. In the same way as you looked for consistency between panels, you should also check for consistency over a single panel as well. Any inconsistencies give you a good indication of vital clues to make your polishing safer.
3 - Interpreting the Readings
As discussed above, looking for inconsistencies is the key to getting as full a picture as possible of the paint on a car. Here we look at what the paint readings may be telling you.
In the case of general readings across a car, any panels giving thicker than average readings can point to a region of paint repair. Normally repsrayed panels are thicker owing to the processes used to spray the paint in the bodyshop. You could expect to see readings of in excess of 200µm. You may think that because the paintwork is thicker that you have more clearcoat to play with and thus more aggressive techniques can be used if required. But this is frequently not the case, as all layers of the paint (base, colour, clear) will be thicker. It is best to err on the side of caution on a resprayed panel and treat it with care. Also, expect the paint hardness and polishing style to vary on resprayed panels as the paint system used may be different to the factory painted panels.
If a panel is giving very thick readings or not reading at all then this is an indication of possible filler on the panel. This can trick you into thinking there is a lot of paint to play with when in actual fact you have thin paint over a lot of filler! This is a rare occurrence but something to be very aware of.
For panels that are giving thinner readings than the average on the car, this points to previous machine polishing or sanding. In these cases it is best to err on the side of caution and use only gentle polishing techniques. It may be the case there is still plenty of clearcoat on the panel but it is a risk which is not worth taking – polish lightly and avoid the use of aggressive compounds.
On a single panel with detailed readings, small thick regions can point to smart repairs (which can typically have very different behaving paint), filled chips or scratches or filler. In all of these cases, exercise caution and use only light polishing techniques, building up the aggression by monitoring the paint removal (see below) carefully. Thin spots point to small repairs, for example by wet sanding, which should only be polished gently to avoid making the clearcoat dangergously thin or even striking through. It is important to take plenty of readings as the thin spots can be no bigger than a postage stamp, but once compounded and struck through, the whole panel will need a respray to get the best quality repair.
A key message here – take plenty readings, and look for inconsistencies and use them to build up a picture of the paint in front of you. A single reading, on its own, tells you nothing. But taking multiple readings and analyse them carefully and you can get a lot of useful information about the paintwork in front of you!
What About Door Shut Readings?
On many cars you can get a good indication of the thickness of paint without clearcoat (and thus, the thickness of the clearcoat itself) by measuring inside the door shuts. Less clearcoat is used on these areas and this can give a good idea of the clearcoat thickness. However this is not a fail safe technique and in some cases there can be thin colour and base coat used on these regions as well. This can lead to a reading on a door shut of say 60µm while on an exterior panel the clearcoat strikes through at 80µm. Use these readings as another part of the story, another useful piece of information. However it is important not to take the readings here too seriously and definitely not use them as an indication as to how thin you can make the paint on exterior panels.
In Practice - Assessing During Polishing
Equally important is the thickness of paint being removed by the polishing process. The clearcoat is essentially a sacrificial layer designed to protect the underlying paint finish but it also adds gloss and gives the final finish as well. The thinner the clearcoat is made, the more its long term integrity can be compromised. Not only that but if the clearcoat is made very thin after one set of polishing, it means that the car cannot be polished months or years down the line when it may be required again. When polishing it is important to achieve sensible correction, the desired level of correction with as little paint removed as possible. To do this, knowing how much paint each process is removing is very important.
It is not possible to use a PTG on a single spot before and after polishing to get an idea of the amount of paint removed as this is subject to large fluctuations for gauge error and the fluctuations of thickness across small regions of paint. For this reason it is best to measure the thickness of the paint over a small area as an average both before and after and then subtract the averages for an approximation of the paint thickness removed.
Method For Assessing Thickness Removed
It is all about averages! On the test section, choose a landmark in the paint – this can be something like a stone chip that you will not polish out. You can also create a landmark by using an LED or laser pointer. If using the latter be careful not to stare directly at the beam and also be very careful of stray reflections from mirror surfaces on the car – lasers can cause permanent eyesight damage and should be used sensibly, with care.
Over a region of about 1 square inch around the landmark, measure 10 – 20 paint thickness readings, taking note of each one. Calculate the average of this reading. After a polishing set, repeat this measurement and calculate the average again. Subtract this average from the first one calculated to find the thickness of paint removed.
Calculating an Average
To find the average of a set of readings, add all of the readings together and then divide the result by the number readings. As an example, say you have the following five paint thickness readings:
• 121, 119, 117, 124, 120
To find the average, add all the readings together:
• 121+119+117+124+120 = 601
Then divide the result by the number of readings, in this case 5:
• 601 / 5 = 120
Intepreting the Results
The key results here are the amount of paint removed by the polishing process. You want to keep this at a minimum while still achieving the desired result.
However, in some cases, it is not possible to achieve full correction and removal of every single deep mark. Use the results of the removed thickness sensibly – if a mark is not removed after the removal of a lot of paint (say 10 - 20µm) then it is prudent to leave the mark. Typically the odd RDS will not be noticed at the end result and it is far safer and better for the finish to leave them rather than removing huge amounts of paint which can compromise the integrity of the clearcoat.
Summary
The total thickness of paint can tell you a lot about what is safe and what is not for polishing – both the initial thickness and the amount of paint removed during polishing. When machine polishing it is important that you remove only a safe amount of paintwork. The use of a single layer gauge can give you a lot of useful information to help you make the decision as to what is safe and what isn’t. Use the gauge as a detective aid rather than simply reading the numbers off as a reading on its own means nothing. But the readings together allow you to build up a big picture of the car you are working on.
Acknowledgements: GlynRS2 & robz (Car Plan Diagrams)
The vast majority of paint systems used on cars today come in three layers: the base coat, the colour coat and the clear coat as shown below.
In these cases you are only ever polishing the clear coat (which is why your pad doesn’t turn the colour of the car). Polishing through the clear coat is known as “strike through” – terminal paint damage that can only be repaired with a re-spray and should therefore be avoided at all costs!
The paint thickness you most want to know is that of the clear coat – however, the majority of paint gauges on the market give you a total thickness reading only. On the face of it this may seem like a useless reading – how do you know how much of the (say) 110µm of paint is clear coat? One answer is to use a gauge which gives you multi-layer readings. However these are expensive and generally out of practical reach for most detailers. Another answer is to use your total layer thickness gauge as a detective, and read the information it gives you wisely. A single reading on its own means nothing. Multiple readings across the car allow you to build up a picture and leave you better informed as to the most appropriate course of action for machine polishing.
Consistency is the Key
With different manufacturers using different paint systems, a reading which may be thick for say a Mazda may be thin for a Volkswagen. Some cars, for example the Ferrari 355, were hand painted and have readings three or four times thicker than what you would find on a 21st century hatchback. Even the same make and model of car will vary for a variety of reasons. Despite there being no consistency across the paints of different cars, you should see a consistency in the paint thickness of the car that you are working on.
For example, all side panels you would expect to be roughly in the same paint range. Likewise, you would expect consistency in thicknesses across say the bonnet. There will be variations but you would not expect them to be large. Rather than picking up on individual readings the aim is to see how consistent the readings are on the car and if there are any thick or thin regions which stand out which would point to either repair of previous heavy polishing. In both cases you would want to exercise great care when machine polishing.
You can then take this one step further – consistency across a panel. Now if you look at a painted panel, you can generally see an orange peel effect which points to an inconsistency in thickness. The peaks and valleys look to have very different thicknesses but this is actually just an optical illusion – the variance is typically only a few microns and a small percentage of the total thickness. With this in mind you would not expect to see large variances (of order 30, 40, 50µm) across a panel. So you can look out for specific regions that show readings notably different to the panel as a whole, giving you an indication of possible thin or thick spots.
In Practice - Assessing Before Polishing
Before using a machine polisher it is important to assess the thickness of paint you have available to you. In this section we will look at how to use a single layer paint thickness gauge to its full potential to give you as much information as possible about the paint thickness available for polishing.
Take the paint measurements in two main stages: general readings across the whole car; detailed readings over individual panels.
1 - General Readings Across The Car
The first set of readings to take are across the car as a whole, with a “few” readings per panel (10, 20 or so). Take a note of the readings and at first compare individual panels to each other.
Take the following example of a car with paint thickness readings shown in the diagram below (simplified to one reading per panel for this discussion).
Here we can see that all of the panels have roughly the same readings in the range of 110µm to 130µm. It is generally assumed that readings of this level are “normal” as well, and that the thickness is “healthy”. However the numbers really don’t give you this information, they simply show that the readings are consistent across the car. This is a good indication that the car has not seen any paintwork repairs and is also a fair indication that there has been no aggressive polishing previously but this latter assumption should not be read as gospel!
Compare this now to the example shown below.
Contrary to the first example which showed similar paint readings, this car shows two clear inconsistencies. Namely the rear passenger side door and the front driver’s side door.
The rear passenger door shows a paint reading which is abnormally high compared to the rest of the car. This is a good indication that this panel has seen a paintwork repair at some point as resprayed panels typically have thicker readings. If all of the car gave these readings then this would be an indication of a possible full respray. However you could not say this for sure as the car itself may have just had thicker paint from the factory. The biggest telling factors here are the inconsistencies rather than the actual paint readings.
The front driver’s door is showing readings which are abnormally low compared to the rest of the car. This is an indication that this region has been heavily polished or compounded before as there has been notable paint removal. In some instances scratches are removed by wet sanding which, when done without consideration, can leave low regions of paintwork. In the case of all of the car having thin paint readings it is a possible indication of full machine polishing previously. However it could also be that the paint thickness is just naturally thin on the car.
2 - Detailed Readings
Having assessed the panels of the car against each other to get a global picture of which may have seen some sort of work in the past, it is now time to look at the panels on their own. It may be tempting to just take a few paint readings and go round the full car in a few minutes. However this will not give you all the information you need to be polishing the car safely.
In this section we look at taking detailed paint readings across the paint on a car. Having spent a lot of money on a paint gauge, you are best to get the most out of it! So spend a good hour or two taking paint readings. It may sound ridiculous but it may just save you from a strike through!
Take the bonnet as an example. Take a paint reading every inch to two inches. An example of some paint readings from a bonnet is shown below.
The consistent reading on the bonnet is between 110µm and 135µm. This is a typical variation across the panel. However we can also see two readings which raise concern – one in the top left and the other bottom middle, both highlighted. One reading is much thicker than the rest of the panel which points to a small region of paint repair or even filler. The other regions shows a thin spot on the panel which points to previous repair by abrasive polishing or wet sanding.
If you were only to take three or four readings per panel, then small regions of concern like the ones above would be missed. This clearly shows the importance of taking many readings across each of the panels. In the same way as you looked for consistency between panels, you should also check for consistency over a single panel as well. Any inconsistencies give you a good indication of vital clues to make your polishing safer.
3 - Interpreting the Readings
As discussed above, looking for inconsistencies is the key to getting as full a picture as possible of the paint on a car. Here we look at what the paint readings may be telling you.
In the case of general readings across a car, any panels giving thicker than average readings can point to a region of paint repair. Normally repsrayed panels are thicker owing to the processes used to spray the paint in the bodyshop. You could expect to see readings of in excess of 200µm. You may think that because the paintwork is thicker that you have more clearcoat to play with and thus more aggressive techniques can be used if required. But this is frequently not the case, as all layers of the paint (base, colour, clear) will be thicker. It is best to err on the side of caution on a resprayed panel and treat it with care. Also, expect the paint hardness and polishing style to vary on resprayed panels as the paint system used may be different to the factory painted panels.
If a panel is giving very thick readings or not reading at all then this is an indication of possible filler on the panel. This can trick you into thinking there is a lot of paint to play with when in actual fact you have thin paint over a lot of filler! This is a rare occurrence but something to be very aware of.
For panels that are giving thinner readings than the average on the car, this points to previous machine polishing or sanding. In these cases it is best to err on the side of caution and use only gentle polishing techniques. It may be the case there is still plenty of clearcoat on the panel but it is a risk which is not worth taking – polish lightly and avoid the use of aggressive compounds.
On a single panel with detailed readings, small thick regions can point to smart repairs (which can typically have very different behaving paint), filled chips or scratches or filler. In all of these cases, exercise caution and use only light polishing techniques, building up the aggression by monitoring the paint removal (see below) carefully. Thin spots point to small repairs, for example by wet sanding, which should only be polished gently to avoid making the clearcoat dangergously thin or even striking through. It is important to take plenty of readings as the thin spots can be no bigger than a postage stamp, but once compounded and struck through, the whole panel will need a respray to get the best quality repair.
A key message here – take plenty readings, and look for inconsistencies and use them to build up a picture of the paint in front of you. A single reading, on its own, tells you nothing. But taking multiple readings and analyse them carefully and you can get a lot of useful information about the paintwork in front of you!
What About Door Shut Readings?
On many cars you can get a good indication of the thickness of paint without clearcoat (and thus, the thickness of the clearcoat itself) by measuring inside the door shuts. Less clearcoat is used on these areas and this can give a good idea of the clearcoat thickness. However this is not a fail safe technique and in some cases there can be thin colour and base coat used on these regions as well. This can lead to a reading on a door shut of say 60µm while on an exterior panel the clearcoat strikes through at 80µm. Use these readings as another part of the story, another useful piece of information. However it is important not to take the readings here too seriously and definitely not use them as an indication as to how thin you can make the paint on exterior panels.
In Practice - Assessing During Polishing
Equally important is the thickness of paint being removed by the polishing process. The clearcoat is essentially a sacrificial layer designed to protect the underlying paint finish but it also adds gloss and gives the final finish as well. The thinner the clearcoat is made, the more its long term integrity can be compromised. Not only that but if the clearcoat is made very thin after one set of polishing, it means that the car cannot be polished months or years down the line when it may be required again. When polishing it is important to achieve sensible correction, the desired level of correction with as little paint removed as possible. To do this, knowing how much paint each process is removing is very important.
It is not possible to use a PTG on a single spot before and after polishing to get an idea of the amount of paint removed as this is subject to large fluctuations for gauge error and the fluctuations of thickness across small regions of paint. For this reason it is best to measure the thickness of the paint over a small area as an average both before and after and then subtract the averages for an approximation of the paint thickness removed.
Method For Assessing Thickness Removed
It is all about averages! On the test section, choose a landmark in the paint – this can be something like a stone chip that you will not polish out. You can also create a landmark by using an LED or laser pointer. If using the latter be careful not to stare directly at the beam and also be very careful of stray reflections from mirror surfaces on the car – lasers can cause permanent eyesight damage and should be used sensibly, with care.
Over a region of about 1 square inch around the landmark, measure 10 – 20 paint thickness readings, taking note of each one. Calculate the average of this reading. After a polishing set, repeat this measurement and calculate the average again. Subtract this average from the first one calculated to find the thickness of paint removed.
Calculating an Average
To find the average of a set of readings, add all of the readings together and then divide the result by the number readings. As an example, say you have the following five paint thickness readings:
• 121, 119, 117, 124, 120
To find the average, add all the readings together:
• 121+119+117+124+120 = 601
Then divide the result by the number of readings, in this case 5:
• 601 / 5 = 120
Intepreting the Results
The key results here are the amount of paint removed by the polishing process. You want to keep this at a minimum while still achieving the desired result.
However, in some cases, it is not possible to achieve full correction and removal of every single deep mark. Use the results of the removed thickness sensibly – if a mark is not removed after the removal of a lot of paint (say 10 - 20µm) then it is prudent to leave the mark. Typically the odd RDS will not be noticed at the end result and it is far safer and better for the finish to leave them rather than removing huge amounts of paint which can compromise the integrity of the clearcoat.
Summary
The total thickness of paint can tell you a lot about what is safe and what is not for polishing – both the initial thickness and the amount of paint removed during polishing. When machine polishing it is important that you remove only a safe amount of paintwork. The use of a single layer gauge can give you a lot of useful information to help you make the decision as to what is safe and what isn’t. Use the gauge as a detective aid rather than simply reading the numbers off as a reading on its own means nothing. But the readings together allow you to build up a big picture of the car you are working on.
Acknowledgements: GlynRS2 & robz (Car Plan Diagrams)


 TOP
TOP
Comment