

 Tweet
Tweet
How To: Restore your oxidized, faded, discolored, or otherwise lightly scratched (or damaged by brake kleen) headlight lenses.
By: Brett Robertson (97 Supra)
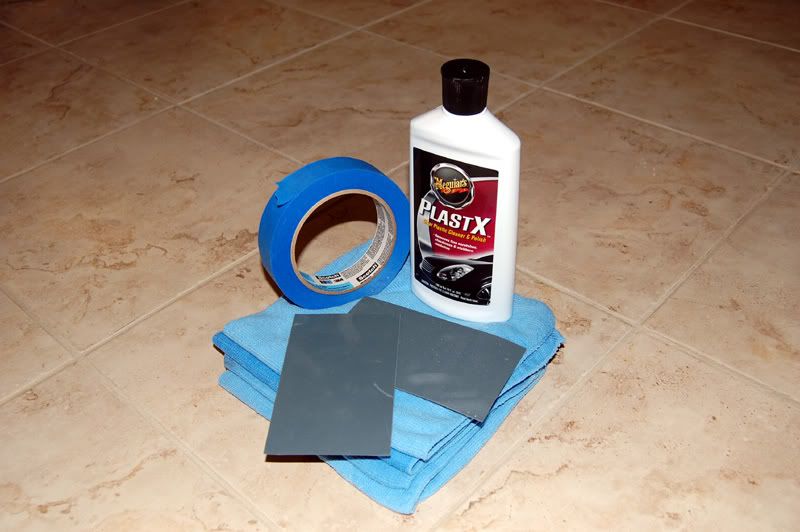
You will need:
1.) Bottle of Meguiar's PlastX
2.) Sandpaper grit depends on the severity of your lens damage. Which ever grit you choose to start with, you must also purchase 1 sheet of the higher number grit paper - up to what ever grit you are comfortable with to complete the restoration process. (I stopped at 2500.)
Example: If you start with 1000, you must also buy 1500 2000 and 2500.
2a.) 1 sheet of 1000 grit (to start with when working on severely oxidized and yellow lenses.)
2b.) 1 sheet of 1500 grit (to start on not so yellow, but very cloudy / faded and or lightly swirled/scratched lenses.)
2c.) 1 sheet of 2000 grit (starting with mostly clear, or barely cloudy lenses)
2d.) 1 sheet of 25000 grit to finish off with (or continue on to 3000 if it makes you happy.)
3.) Any # pack of microfiber towels.
4.) 1 flannel cloth - any size, just make sure it's easy to fold up and work on your headlight with.
5.) 1 roll of your favorite masking tape, I chose 3M blue 1" masking tape.
6.) 1 bucket your size and color choice don't matter so much as long as the container is large enough to soak your sheets of sand paper in, it will work.
The Process:
1.) Gather your supplies.
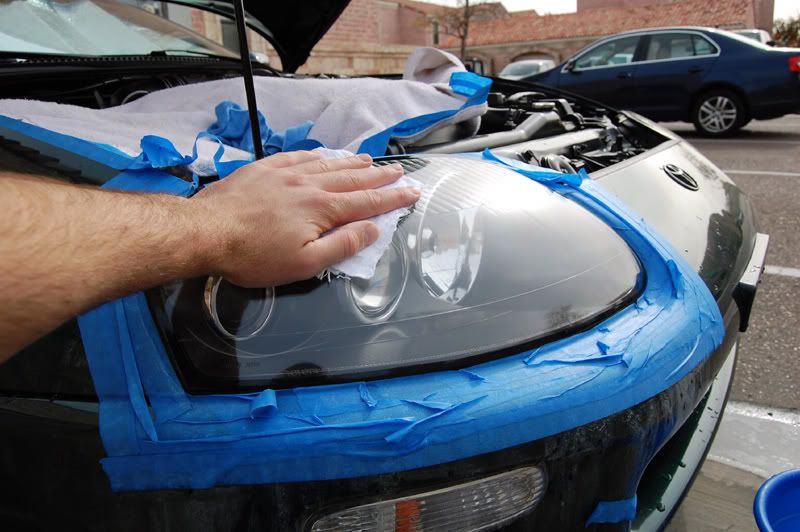
2.) Mask off the light you choose to work with first using the masking tape. Be generous, you do not want to accidentally slip and sand your precious paint job.
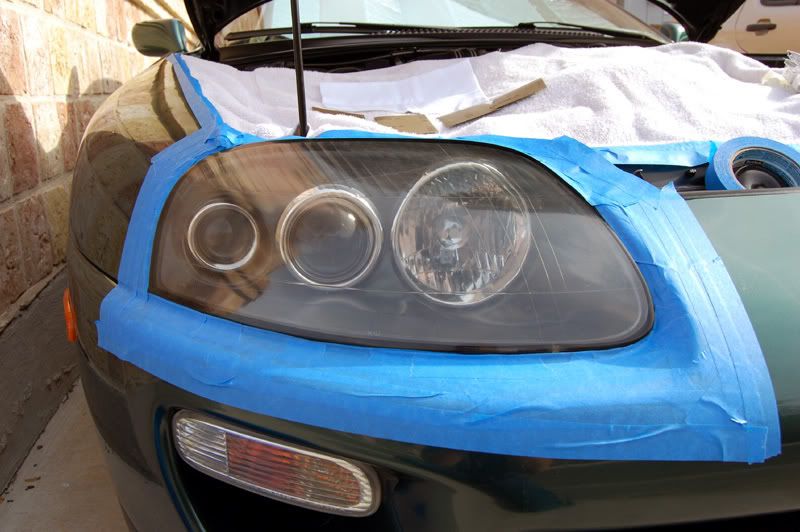
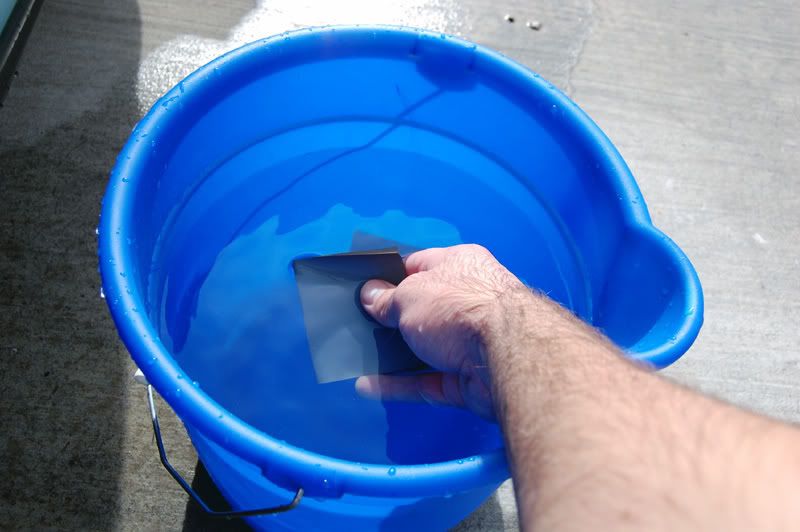
3.) Cut your different grit papers (1000, 1500, 2000, 2500) into workable sizes. Allow them all to soak in your bucket for 8-10 minutes to make sure they are saturated.
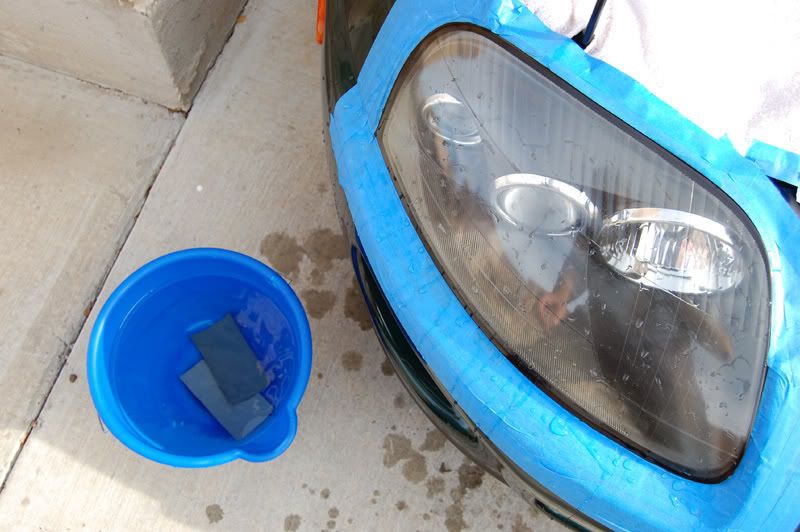
4.) Remove your first lowest grit paper from the water (I started with 2000) and fold it in half. Choose 1 direction to sand in to start with, vertically or horizontally. (I chose vertical to start.) do NOT sand in a circle. Sand the lens until it is uniform, and looks evenly worked.
4a.) Be sure to keep applying water to the working area via spray bottle, cup, or other method to ensure adequate water is being supplied to the paper which working with it.
4b.) Be sure to dip your sanding hand, along with the sand paper you are working with into the bucket often as to flush the debris off of you and the paper.

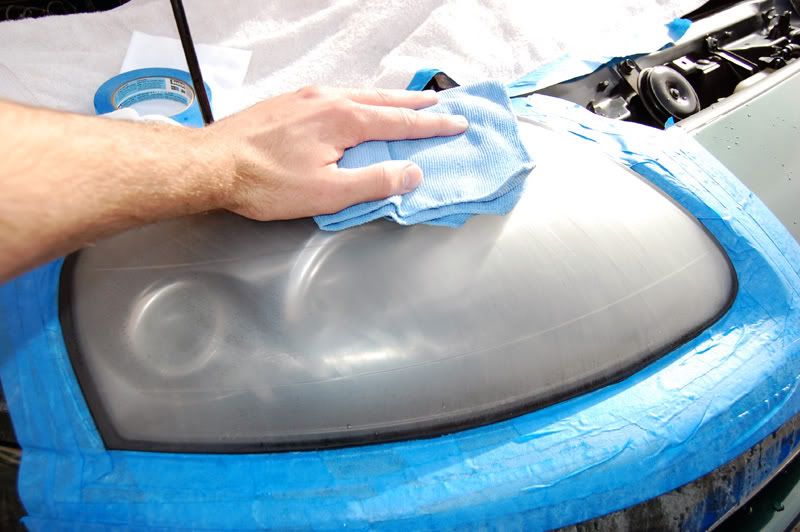
5.) Using 1 of your many microfiber cloths, dry the lens off to check for consistency in your work. Feel free to do this as many times as necessary to ensure you are getting a uniform surface.
6.) Once you have dried the lens, and checked for a uniform surface, go ahead and change the water in your bucket. Place your other papers back in the clean water, and select the next grit paper. (I used 2500 now.)
6a.) Fold the new paper in half, and soak the lens before applying the higher grit wet sand paper to the lens.
6.b) Sand in the opposite direction as you did previously. (every time you switch grit paper.) If you started out sanding vertically as I did, you will now be sanding horizontally.
7.) Sand in the opposite direction with your next higher grit paper as I previously mentioned. Keep rinsing off your working hand, and working paper. As well, be sure to keep wetting the lens as you are working as I previously mentioned.
8.) Once you have sanded in the opposite direction with your higher grit paper, make sure the surface is evenly worked by drying the lens off with a new microfiber cloth. If necessary re-sand until the surface is evenly sanded.
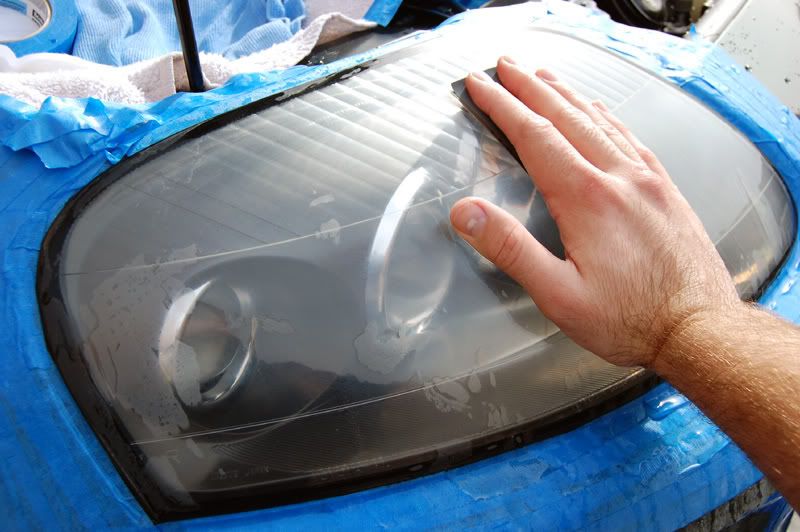
9.) At this point the lens is going to look cloudy from sanding, but not as cloudy as the previous grit left the lens. (see previous photo compared to this one.)
9a.) Repeat the previous steps with higher grit sandpaper if you choose to for a finer finish before the following steps. (I did not, I finished with 2500.)
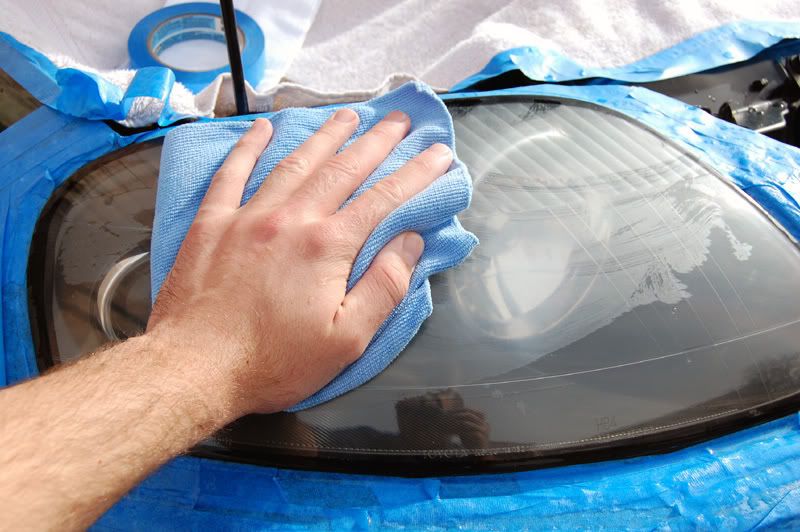
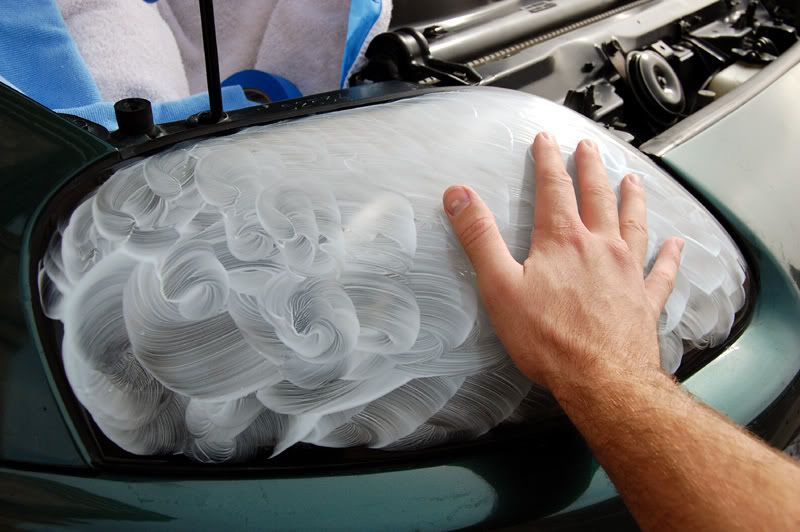
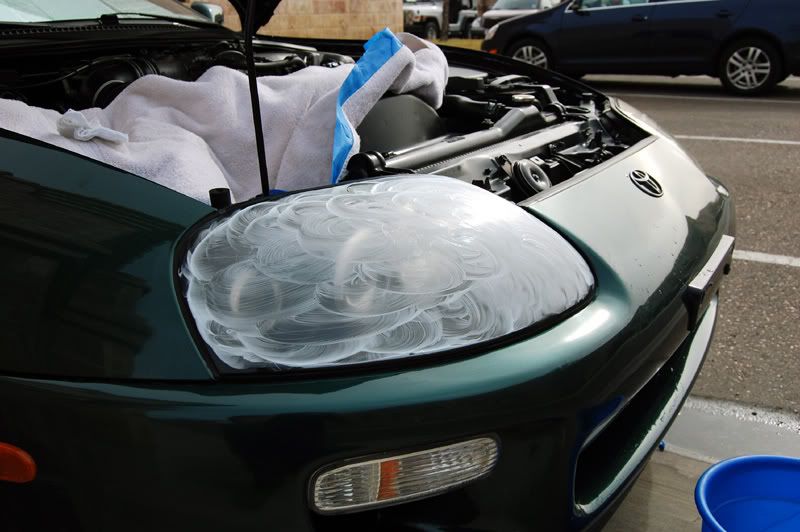
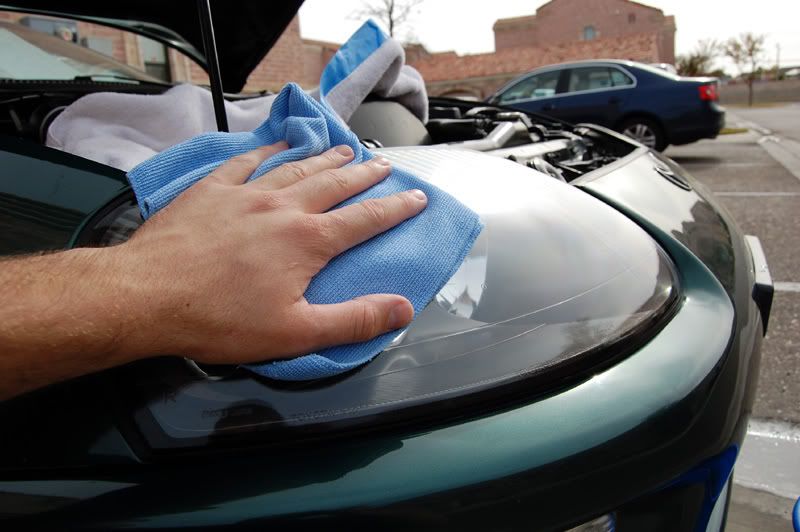
10.) Heres where that oddball flannel cloth I told you to get comes in. Get out your Meguiar's PlastX and put a dime size on the flannel cloth. Apply firm pressure to the cloth against the the lens and in a circular motion work small areas at a time, maintaining firm pressure. Do not press so hard you crack or damage your lens, use good judgment, the more firm you press the better the polish works. Once you have worked one area, allow the PlastX to dry there, and work another area - repeat until you have worked the entire lens surface.
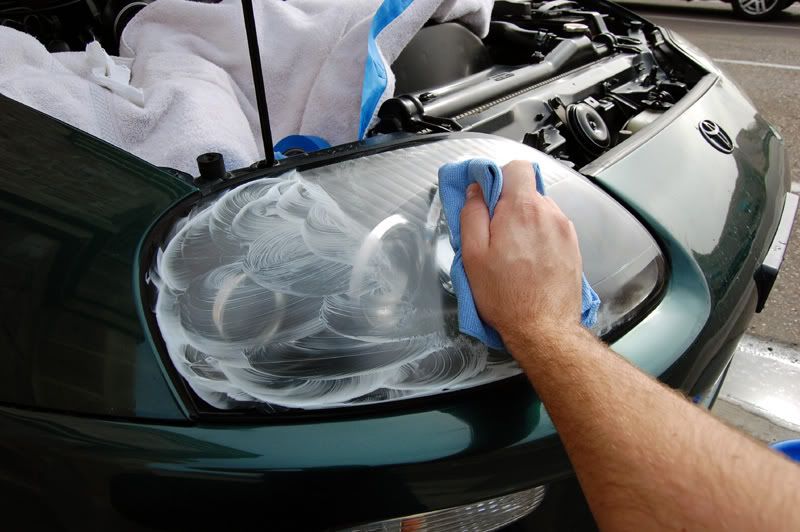
11.) Once you have finished working in your PlastX, use another one of your fresh microfiber cloths and remove the plastX from the lens.
11a.) To obtain the best possible clarity, you will need to repeat steps 10 and 11 until you have the the clarity you desire. This may get tedious, but the results are well worth it.
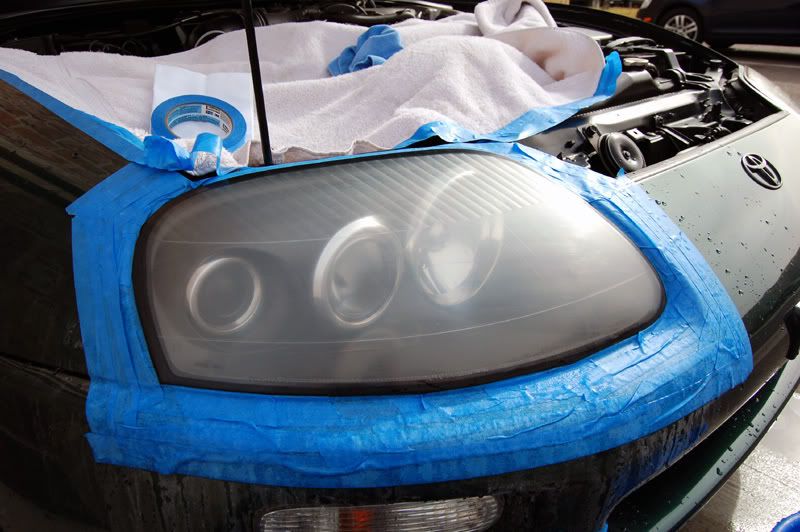
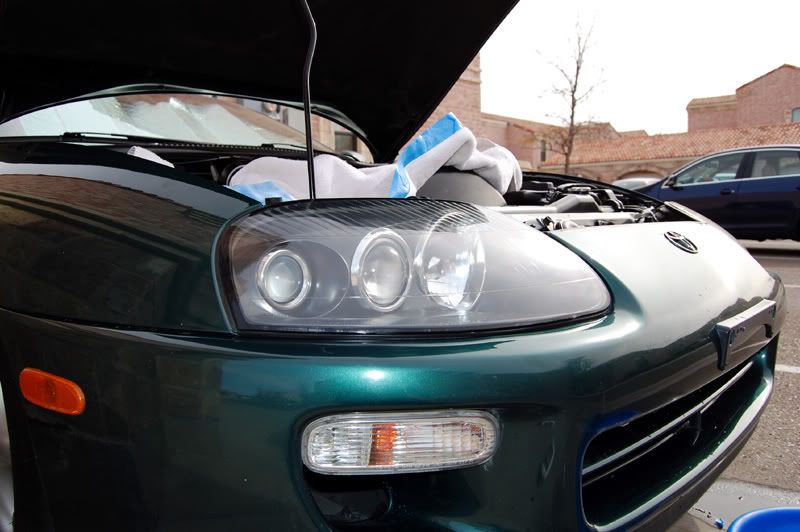
12.) Once the desired clarity has been reached, remove your masking tape.

13.) Once the tape has been removed, go ahead and place a generous amount of PlastX on your hand and work it in real good. Once the lens is completely covered, stop and allow the product to dry on the lens. This may take a few minutes depending on the temperature and humidity around you. (You may also work the PlastX around with a fresh microfiber cloth if you fear you might be allergic to any chemicals.)
14.) Man we love some microfiber. With a fresh microfiber cloth, polish the lens clean using a fresh side of the cloth for your final swipe.
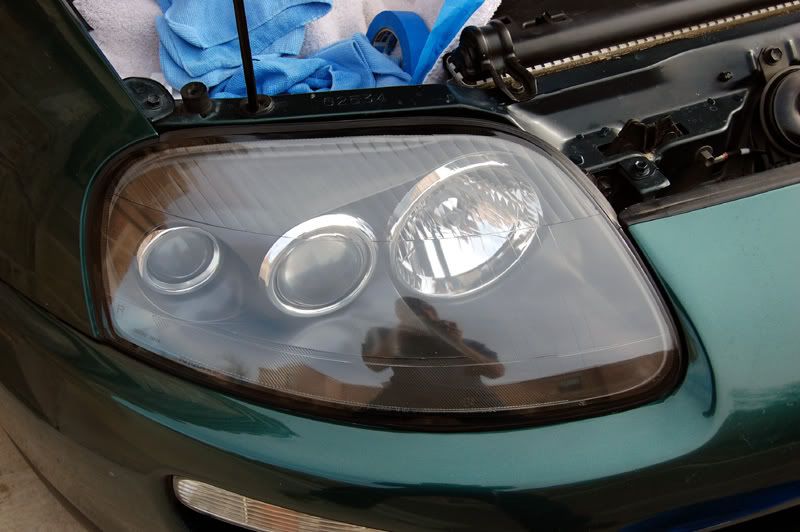
15.) Make sure you have cleaned off any excess product, or sanding materials from the lens and stand back to take a look at the results.
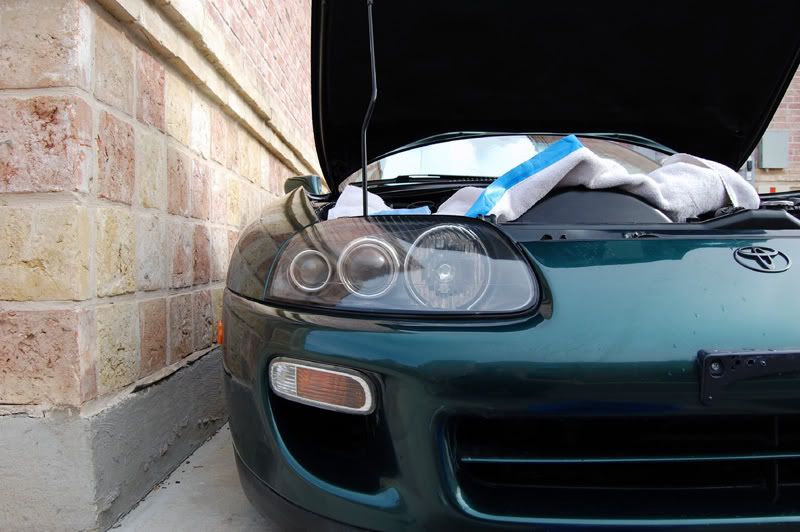
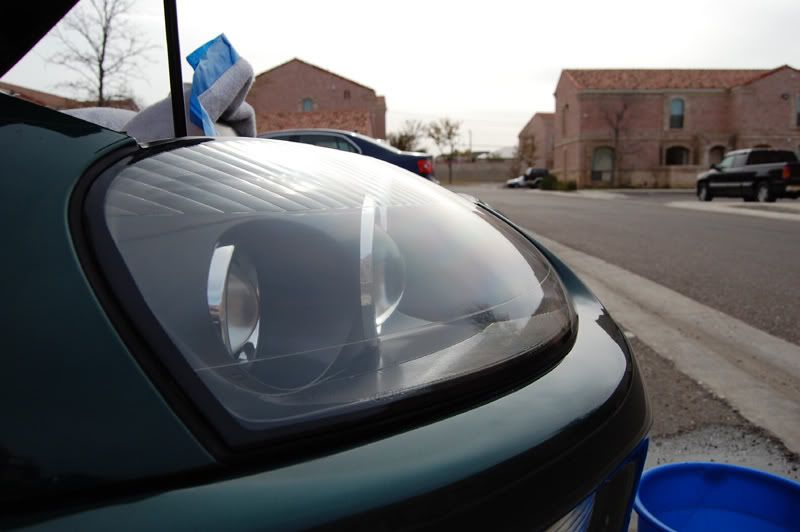
15a.) Repeat this process for the other headlight lens.
16.) If you want to seal the headlights, choose the Meguiar's product of your choice and apply it at this time. I will be using some NXT liquid on my light to keep the newly refinished surface sealed and better protected.
Disclaimer:
This "how to" was my own personal experience. I am sharing it with you because I was very satisfied with the results. I can not guarantee your results will be the same, as your workman ship may differ from my own. As well, every lens damage is NOT identical. Some may turn out for better or worse. You just watched me do this to my 1997 Toyota Supra (It's 1 of 55.) New headlights would have cost me about $800.00. I spent about $15.00 on the supplies to end up with these results following the process I described above. Take that for what it's worth, and always detail using your best judgment.
Thanks for looking, I can't wait to go for a night drive! Often the results of this (depending on the condition of your lenses prior to the process) light output and night visibility can be improved as much as 50%.
- Brett Robertson
By: Brett Robertson (97 Supra)
You will need:
1.) Bottle of Meguiar's PlastX
2.) Sandpaper grit depends on the severity of your lens damage. Which ever grit you choose to start with, you must also purchase 1 sheet of the higher number grit paper - up to what ever grit you are comfortable with to complete the restoration process. (I stopped at 2500.)
Example: If you start with 1000, you must also buy 1500 2000 and 2500.
2a.) 1 sheet of 1000 grit (to start with when working on severely oxidized and yellow lenses.)
2b.) 1 sheet of 1500 grit (to start on not so yellow, but very cloudy / faded and or lightly swirled/scratched lenses.)
2c.) 1 sheet of 2000 grit (starting with mostly clear, or barely cloudy lenses)
2d.) 1 sheet of 25000 grit to finish off with (or continue on to 3000 if it makes you happy.)
3.) Any # pack of microfiber towels.
4.) 1 flannel cloth - any size, just make sure it's easy to fold up and work on your headlight with.
5.) 1 roll of your favorite masking tape, I chose 3M blue 1" masking tape.
6.) 1 bucket your size and color choice don't matter so much as long as the container is large enough to soak your sheets of sand paper in, it will work.
The Process:
1.) Gather your supplies.
2.) Mask off the light you choose to work with first using the masking tape. Be generous, you do not want to accidentally slip and sand your precious paint job.
3.) Cut your different grit papers (1000, 1500, 2000, 2500) into workable sizes. Allow them all to soak in your bucket for 8-10 minutes to make sure they are saturated.
4.) Remove your first lowest grit paper from the water (I started with 2000) and fold it in half. Choose 1 direction to sand in to start with, vertically or horizontally. (I chose vertical to start.) do NOT sand in a circle. Sand the lens until it is uniform, and looks evenly worked.
4a.) Be sure to keep applying water to the working area via spray bottle, cup, or other method to ensure adequate water is being supplied to the paper which working with it.
4b.) Be sure to dip your sanding hand, along with the sand paper you are working with into the bucket often as to flush the debris off of you and the paper.
5.) Using 1 of your many microfiber cloths, dry the lens off to check for consistency in your work. Feel free to do this as many times as necessary to ensure you are getting a uniform surface.
6.) Once you have dried the lens, and checked for a uniform surface, go ahead and change the water in your bucket. Place your other papers back in the clean water, and select the next grit paper. (I used 2500 now.)
6a.) Fold the new paper in half, and soak the lens before applying the higher grit wet sand paper to the lens.
6.b) Sand in the opposite direction as you did previously. (every time you switch grit paper.) If you started out sanding vertically as I did, you will now be sanding horizontally.
7.) Sand in the opposite direction with your next higher grit paper as I previously mentioned. Keep rinsing off your working hand, and working paper. As well, be sure to keep wetting the lens as you are working as I previously mentioned.
8.) Once you have sanded in the opposite direction with your higher grit paper, make sure the surface is evenly worked by drying the lens off with a new microfiber cloth. If necessary re-sand until the surface is evenly sanded.
9.) At this point the lens is going to look cloudy from sanding, but not as cloudy as the previous grit left the lens. (see previous photo compared to this one.)
9a.) Repeat the previous steps with higher grit sandpaper if you choose to for a finer finish before the following steps. (I did not, I finished with 2500.)
10.) Heres where that oddball flannel cloth I told you to get comes in. Get out your Meguiar's PlastX and put a dime size on the flannel cloth. Apply firm pressure to the cloth against the the lens and in a circular motion work small areas at a time, maintaining firm pressure. Do not press so hard you crack or damage your lens, use good judgment, the more firm you press the better the polish works. Once you have worked one area, allow the PlastX to dry there, and work another area - repeat until you have worked the entire lens surface.
11.) Once you have finished working in your PlastX, use another one of your fresh microfiber cloths and remove the plastX from the lens.
11a.) To obtain the best possible clarity, you will need to repeat steps 10 and 11 until you have the the clarity you desire. This may get tedious, but the results are well worth it.
12.) Once the desired clarity has been reached, remove your masking tape.
13.) Once the tape has been removed, go ahead and place a generous amount of PlastX on your hand and work it in real good. Once the lens is completely covered, stop and allow the product to dry on the lens. This may take a few minutes depending on the temperature and humidity around you. (You may also work the PlastX around with a fresh microfiber cloth if you fear you might be allergic to any chemicals.)
14.) Man we love some microfiber. With a fresh microfiber cloth, polish the lens clean using a fresh side of the cloth for your final swipe.
15.) Make sure you have cleaned off any excess product, or sanding materials from the lens and stand back to take a look at the results.
15a.) Repeat this process for the other headlight lens.
16.) If you want to seal the headlights, choose the Meguiar's product of your choice and apply it at this time. I will be using some NXT liquid on my light to keep the newly refinished surface sealed and better protected.
Disclaimer:
This "how to" was my own personal experience. I am sharing it with you because I was very satisfied with the results. I can not guarantee your results will be the same, as your workman ship may differ from my own. As well, every lens damage is NOT identical. Some may turn out for better or worse. You just watched me do this to my 1997 Toyota Supra (It's 1 of 55.) New headlights would have cost me about $800.00. I spent about $15.00 on the supplies to end up with these results following the process I described above. Take that for what it's worth, and always detail using your best judgment.
Thanks for looking, I can't wait to go for a night drive! Often the results of this (depending on the condition of your lenses prior to the process) light output and night visibility can be improved as much as 50%.
- Brett Robertson


Comment